Campaign Manager Customizations and New Features Manual
1. General Campaign Management Overview
The Campaign Manager is a web based tool that's available via HTTP and HTTPS. We recommend that you always use HTTPS when accessing the Web Interface. To log into the Campaign Manager please go to:
https://production.me.syniverse.com/macys/
and enter your User/Password credentials:
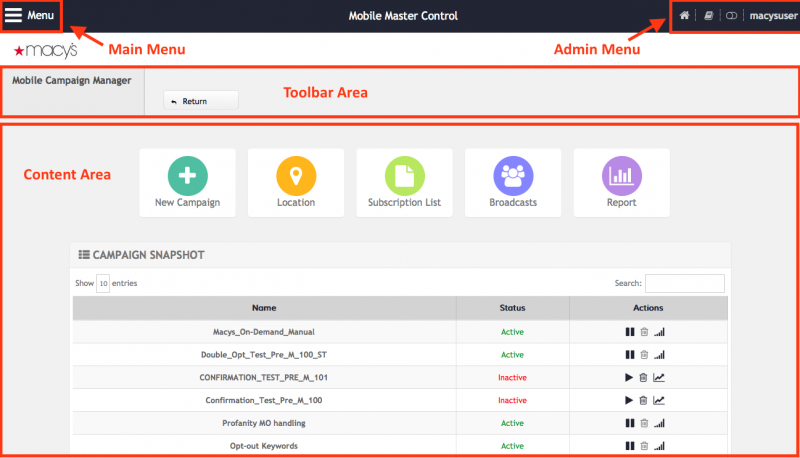
The Home Screen is the first page displayed after you log in to your account. The layout of the Home Screen varies depending on the role assigned to the account you are using. Every MMC screen is divided in 5 main elements:
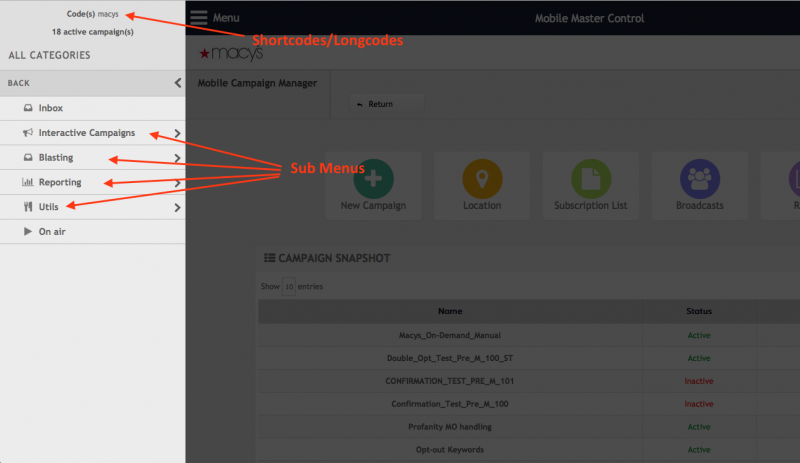
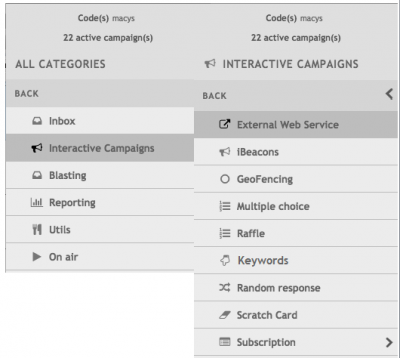
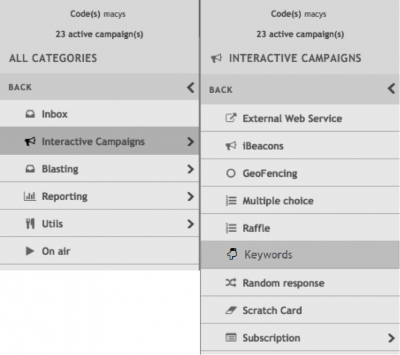
Clicking on the Main Menu Button will slide the Main Menu Panel from the left of the screen. In the Main Menu Panel you will see the a brief header with the available shortcodes and the Main Menu options. When navigating the Main Menu you will find options preceded by a < sign. Those options are sub menus that group additional options. So for example if you wish to set up a Keywords campaign, you would click on Interactive Campaign and then Keywords.
Return to the Home Screen by clicking on the Home Icon found in the Admin Menu on any screen.
2. How to perform a static upload
Upload must be performed from a .CSV file where the first (and only mandatory) parameter is going to be the telephone number followed by all additional attributes separated by a comma “,” as shown in the image below:
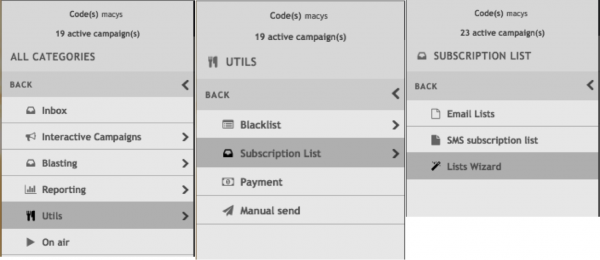
To start uploading and creating a subscription list, select from the Menu button in the toolbar Utils, then Subscription List and finally List Wizard:
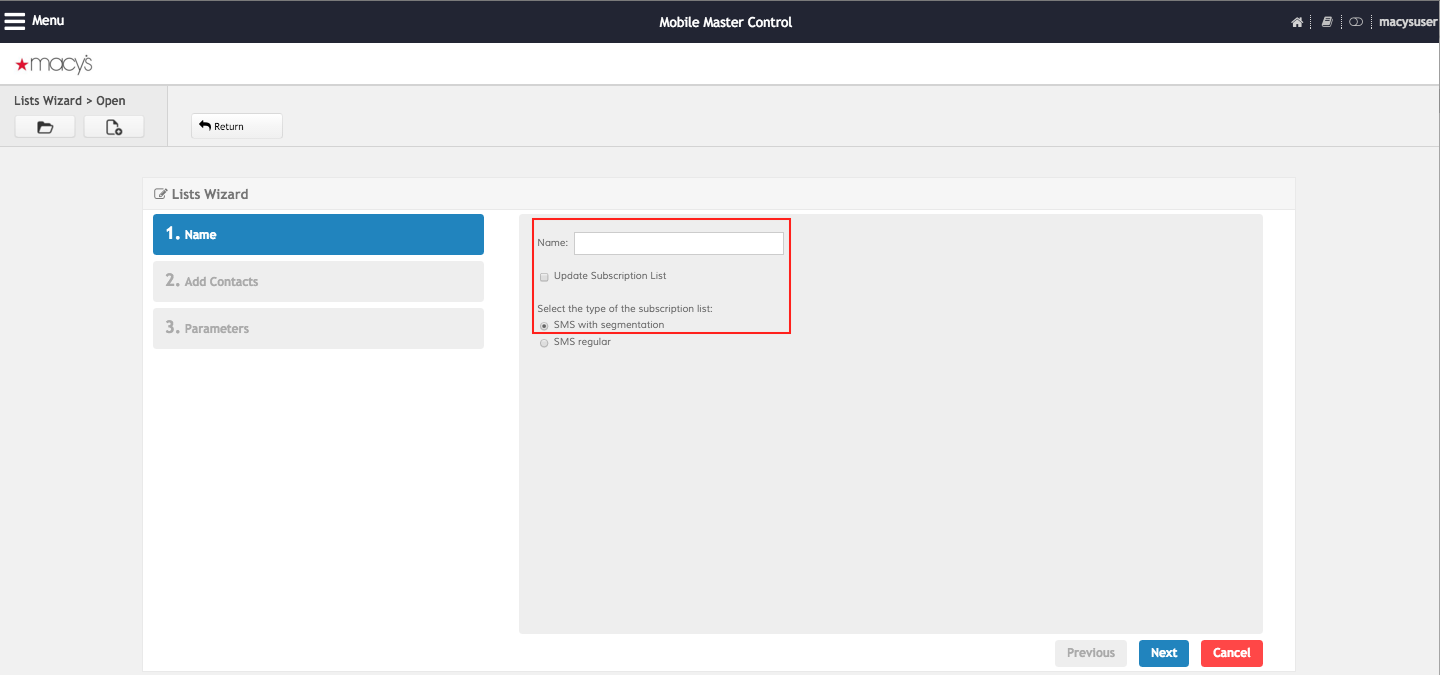
Now proceed to fill in requested information –Name, file or URL-. As a list with parameters is going to be uploaded, SMS with segmentation option must be chosen:
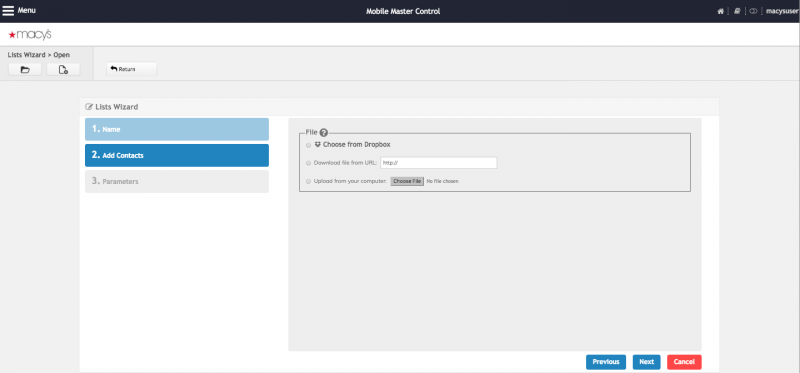
You have several options to specify the Segmentation File when creating a new list: Files can be uploaded directly from your computer, they can be uploaded from an URL or you can use Dropbox. Please note that some browsers may have issues when uploading big files (over 100,000 records) from your computer. Click Next once you've selected the file to use.
The Segmentation wizard uses a heuristic approach to determine the data types used in the uploaded file. Dates, Strings and Integers are detected using a multitude of formatting filters. Once the types have been inferred from the segmentation data you will also have the option to modify them. All parameters are shown with its name, label and type. Label and Type can be modified prior to saving the list:
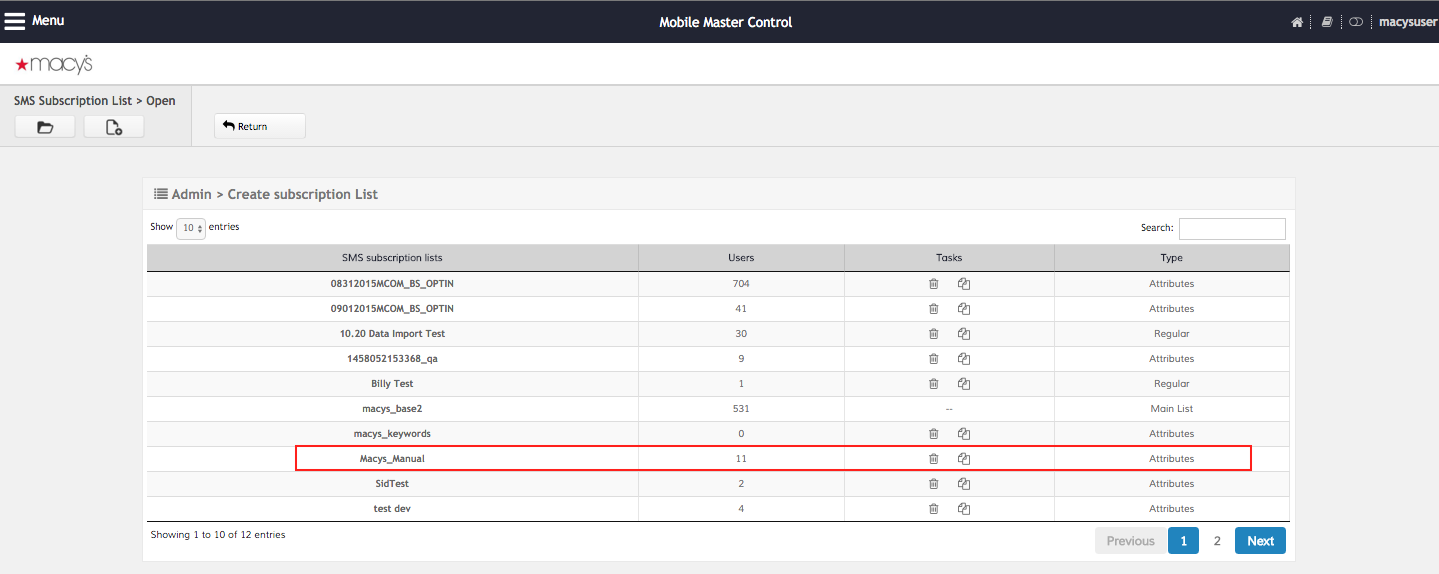
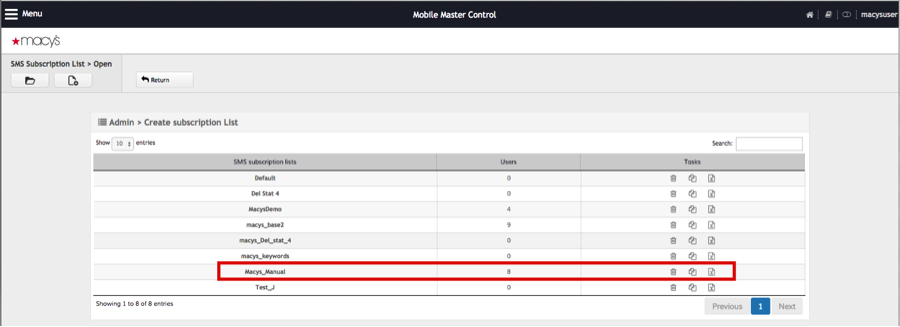
Once the list is created and the data uploaded you will be able to find it in the Subscription List home page:
3. Double Opt-In (DOI) Actions
Double optin actions are used to confirm the user consent to receive notifications from specific campaigns. Several double optin actions can exist in the same shortcode, adding users to different consent lists or sending personalized messages depending on the channel used to start the action.
These actions are actually created combining two types of actions: a Multiple Coice with type Menu which presents the user with the available options (in this case to conset for optin or to reject the request), and another action that executes the user's consent. The second action will normally be a Subscription action that adds the mobile number to a Subscription List, but it can actually be any other type of action which provides a huge level of customization.
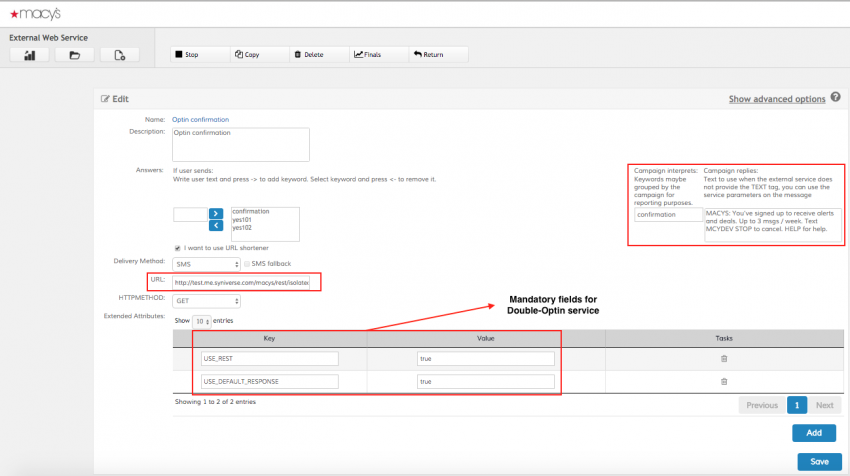
In the current case we use an External Web-service to execute several customized actions (like updating the user's extended attributes in the segmentation list and calling a callback in the backend platform).
In order to create a Double Opt-in process, first we must create the Active campaign that will be linked to this feature.
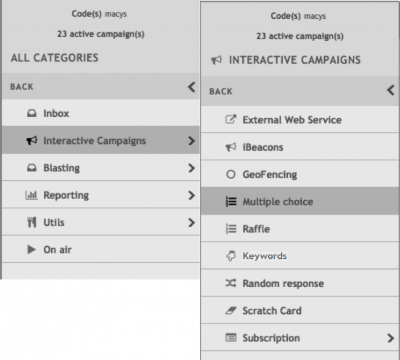
Select from Menu in the toolbar the Interactive Campaigns option and then External Web Service option:
Now proceed to create a New External Web Service:
Then proceed to fill in all requested information and to activate the External Web Service:
As the second step to complete the Double Opt-in process, we have to create it in order to link it to previous campaign.
To create a Double Opt-in process you must select from Menu in the toolbar the Interactive Campaigns option and then Multiple Choice option:
Now proceed to create a New Multiple Choice interaction:
Enter a name for the the Double Opt-in interaction, select “Menu” type option and click next:
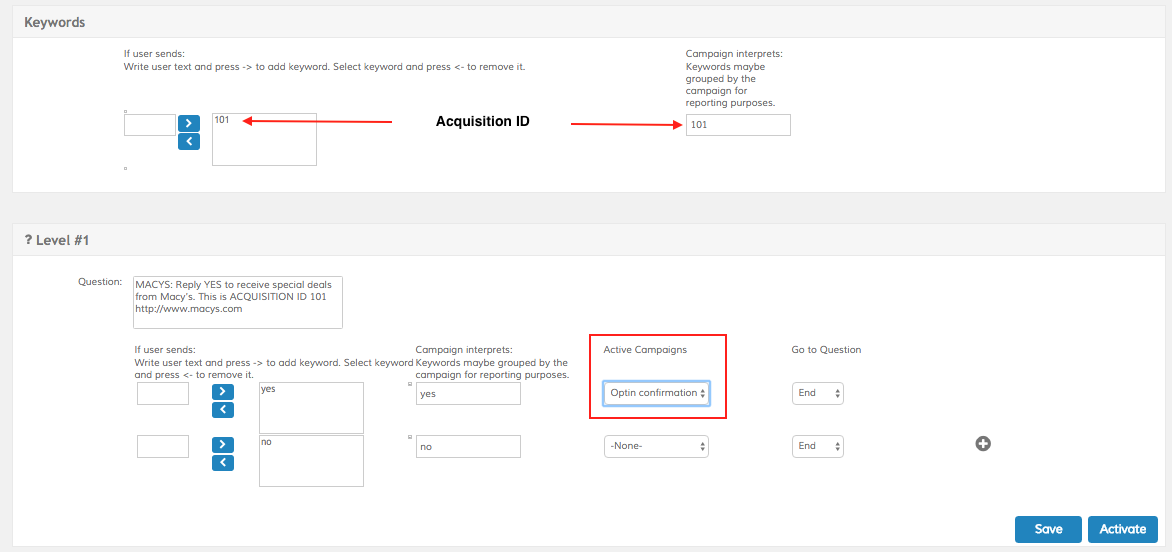
Enter the text for the Double Opt-in initial message and create the two options to be presented in the menu, usually YES and NO. Use the Active Campaigns to associate each response with the corresponding action (associate the YES response with the Subscription action and the NO response with the unsubscription action). Click Activate to save and activate the Double Opt-in Interaction.
4. Blast Campaigns
A Broadcast campaign is an MT campaign that sends messages to specific distribution groups. Marketers will use blast campaigns to send out promotions to targeted mobile numbers. Distribution groups for blast campaigns can be an opt-in based group, a custom group or a combination of multiple groups. Broadcast campaigns can be delivered via SMS or Push. Push broadcasts can be configured so that if the user does not have the corresponding application installed a SMS fallback is send instead.
Type of Broadcasts:
There are 4 types of broadcasts in the MMC: - Broadcast: A blast where the exact same message is delivered to all the users in the broadcast list. - Broadcast by File: A blast where each user receives a completely different message, loaded from an Excel or CSV file. - Personalized Broadcast: A blast where each user will receive almost the same message, based on a template and personalized fields. - Email Broadcast: A blast via Email
Broadcast
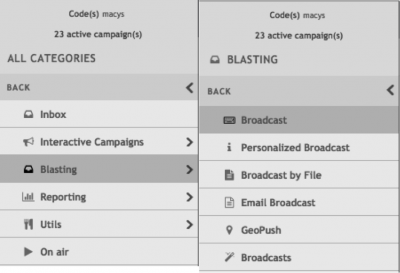
To create a broadcast campaign navigate to the Blasting submenu in the Main Menu and select Broadcast:
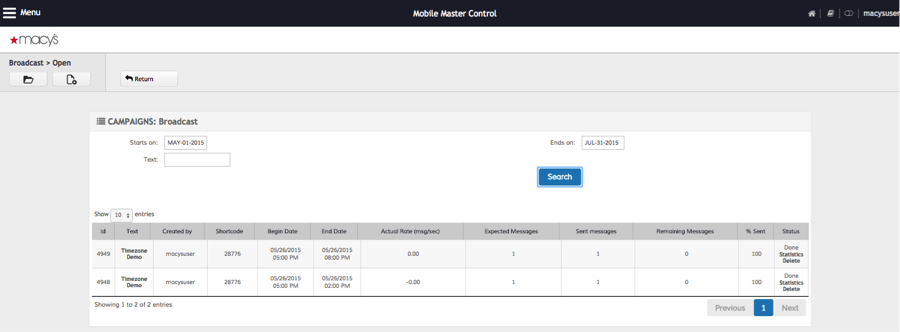
The main broadcast screen shows all the past blasts that have been delivered, including a few stats for each one such as Message Delivery Rate, Expected Messages, Sent Messages, Remaining Messages, % Sent and status. Using the Status link an active broadcast can be suspended temporarily or cancelled permanently (please note that some broadcasts may show a % Sent greater than 100% in cases where messages have been retried or a fallback method was used):
To create a new Broadcast campaign you must click on the New Broadcast button on the toolbar:
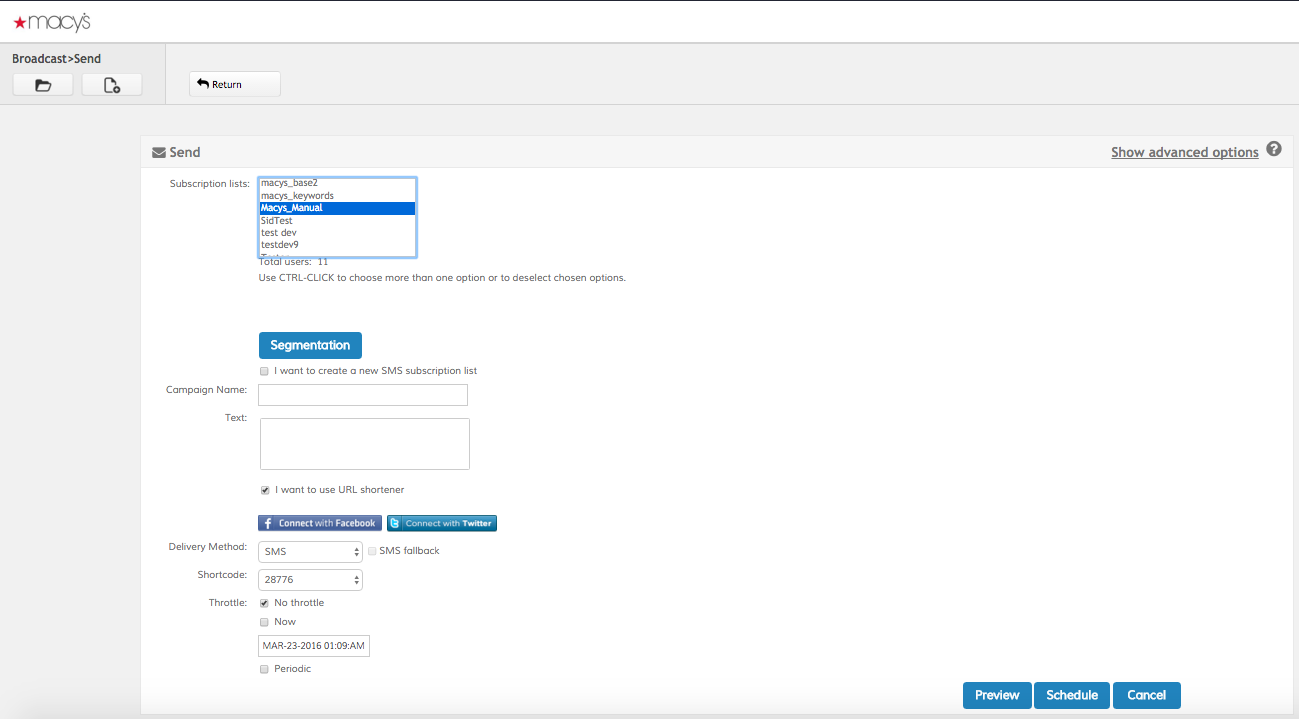
This will open the New Broadcast screen:
Here's the breakdown of the required fields:
| Field | Description |
|---|---|
| Distribution Lists | The Distribution Lists containing the users that will receive the broadcast. You can select none (in which case you must upload an Excel or CSV file in the I want to create a new SMS distribution list option), one or multiple lists (using the Ctrl key in Windows or Command key in OSX). Distribution lists can be populated in other campaigns. For example, you can use a Subscription campaign to add users to a distribution list, and then use the Broadcast tool periodically to send MTs to all the subscribed users |
| I want to create a new SMS distribution list | Check this option if you don't want to use an existing distribution list. Upon selecting this option you will be able to upload a CSV or Excel file from you computer, or select an existing file in your Dropbox account. If you select this option you will be required to enter a name for the new distribution list that will be created |
| Campaign Name | The name of the campaign. Please use a concise name and avoid special characters |
| Text | The text of the broadcast. All users in this campaign will receive the exact same text |
| Share on Facebook | If you connect your Facebook account to your Campaign Manager account you can share the broadcast text in your Facebook Wall, allowing you to broadcast your campaign in all channels |
| Share on Twitter | If you connect your Twitter account to your Campaign Manager account you can share the broadcast text in your Twitter Timeline, allowing you to broadcast your campaign in all channels |
| Delivery Method | Select the delivery method: SMS, Push, USSD, MMS or Voice call (via TTS) |
| SMS Fallback | Only available when using Push as delivery method. Alows you to tell the platform to fallback to SMS if the user does not have the application that will receive the Push Notification installed in his handset |
| Shortcode | The shortcode to use to send the SMS broadcast |
| Throttle | Uncheck the No throttle option if you wish to throttle the delivery of the broadcast. Enter the amount of messages and the minute period in which those messages should be delivered |
| Starts on | By default Now is checked. Uncheck the Now option to schedule the delivery for a later date and time |
| Periodic | Check the Periodic option to schedule periodic deliveries. Using this feature you can program your broadcasts to be redelivered on Daily, Weekly, Monthly and Yearly periods depending on your requirements |
| Restricted Schedules | Uncheck the No Restricted Days option to define a restricted set of week days on which the users must not be messaged. Uncheck the No restricted hours to enter the time at which users must not be contacted. Using this option you can prevent messages to be delivered at sensitive times, for example before 8:00 am or after 10:00 pm (the default) |
Use the Preview button to see all the messages that will be delivered to all the users. Once you validate all the fields click on Send and the broadcast will be delivered.
Once you click Send you will be taken to the Broadcast Main Screen. There you will see the broadcast and the delivery information in real time.
5. Keyword Campaign (Associated with a store ID)
In order to set a Keyword Campaign associated with a store ID we must go to Menu > Interactive Campaigns > Keywords
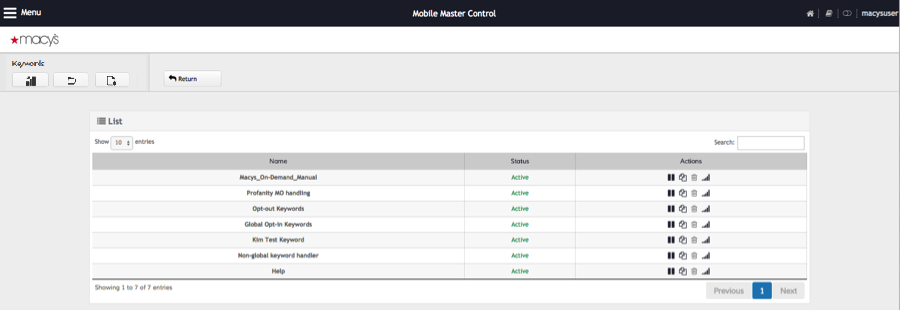
The main Keywords screen shows all the interactions that are created, the status and options to pause, copy, delete or see the results from that specific campaign:
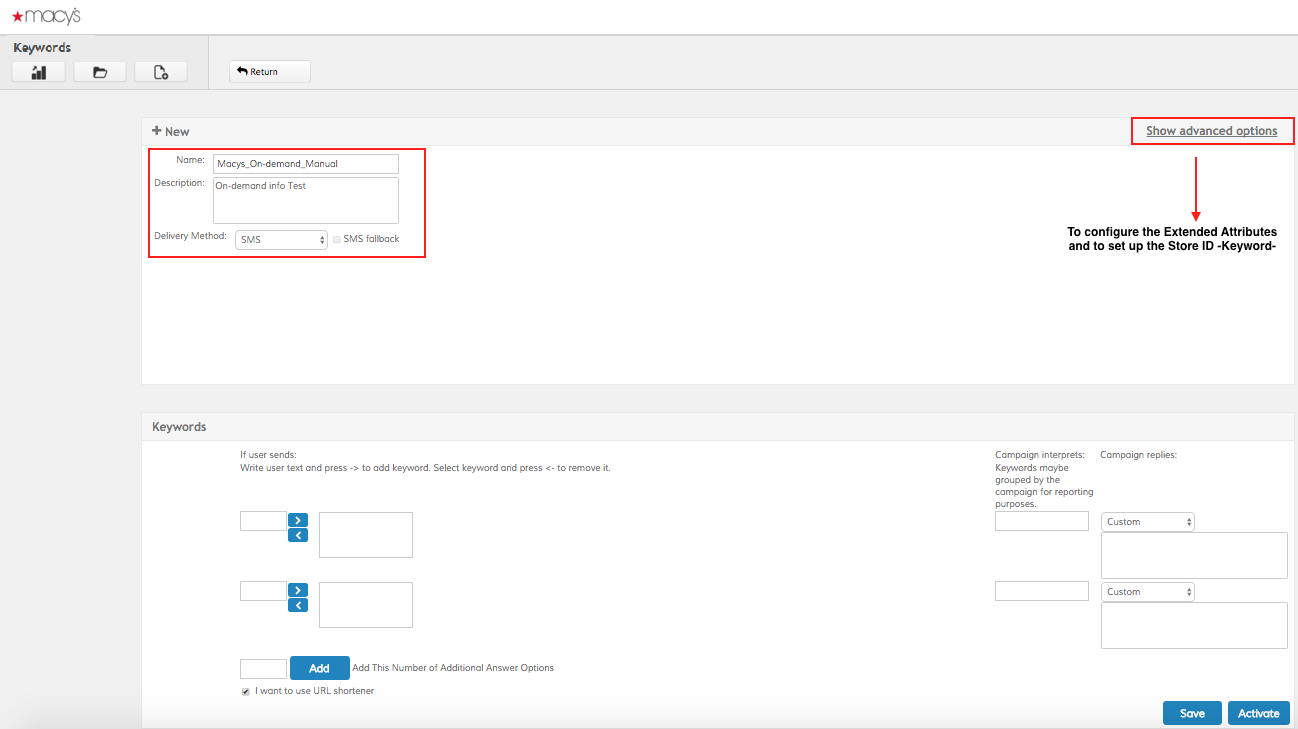
To create a new Keywords campaign you must click on the New button on the toolbar:
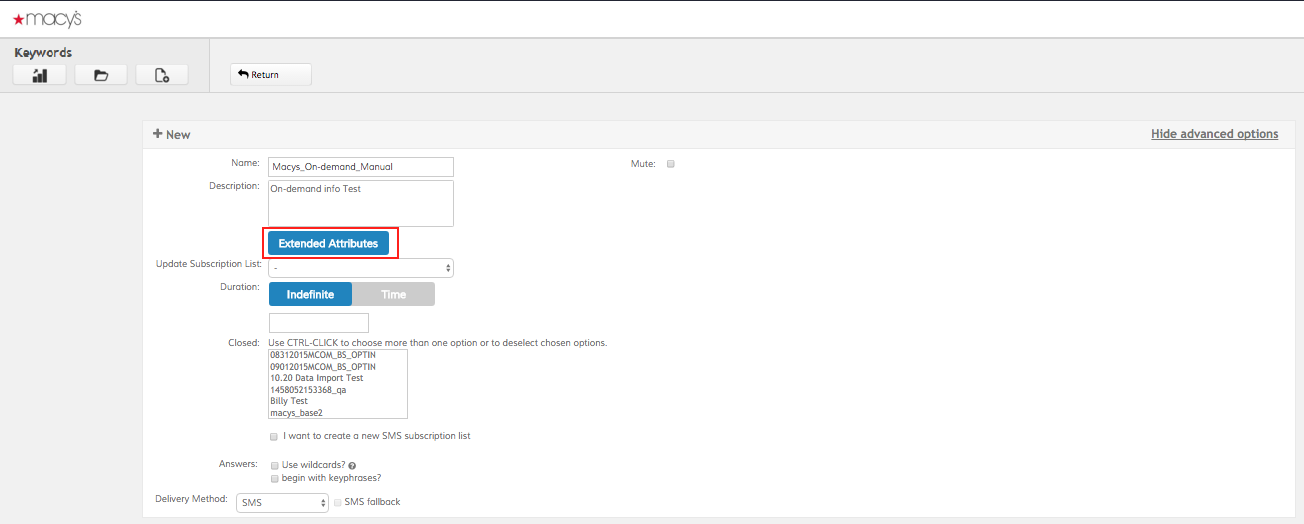
Fill in all requested information and click on Show Advance Options:
In order to configure the Keyword Campaign associated with a store ID, you must click on Extended Attributes:
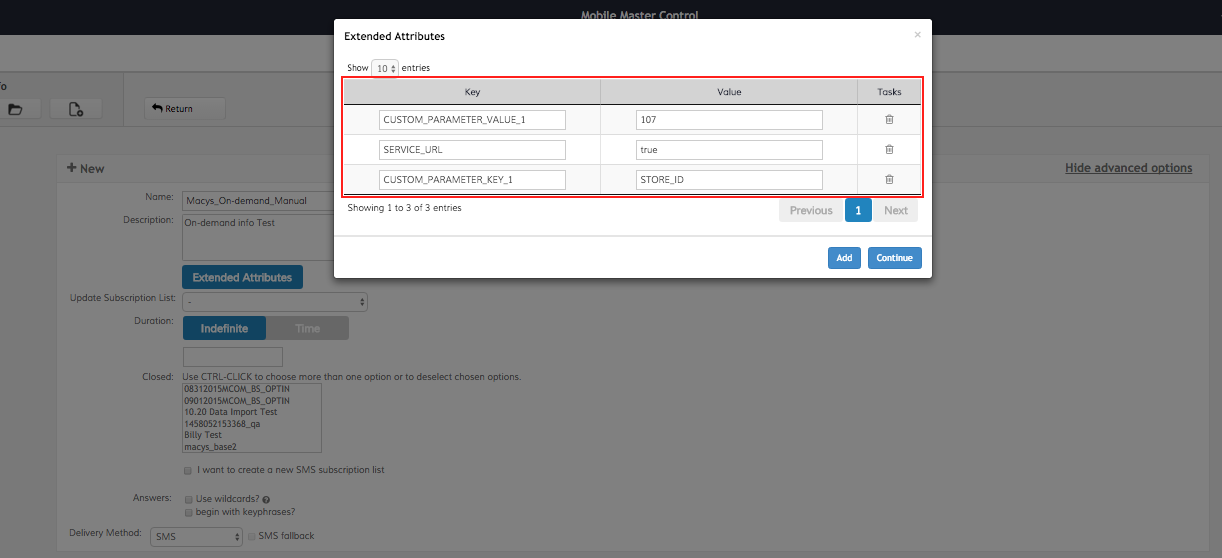
After that, a new window will be shown where parameters should be configured in order to set up the Keyword Campaign associated with a Store ID:
Each store has a unique ID value and it has to be changed in CUSTOM_PARAMETER_VALUE_1. Once the value of the store is correct click in continue.
Now the keyword identifying the store must be configured as shown below and then proceed to activate the campaign:
Here's the breakdown of the required Extended Attributes:
| Extended Attribute | Value |
|---|---|
| SERVICE_URL | The SERVICE_URL triggers the call from a campaign to a WebService that has been previously configured, every time it gets any of its keywords. |
| CUSTOM_METHOD (Mandatory) | This represents the method’s name that will be called internally by the campaign |
| CUSTOM_CALLBACK | This represents the action’s name to be reported in the callback action to the client |
| CUSTOM_PARAMETER_KEY_1…n | The name of a parameter to be modified in the segmentation list |
| CUSTOM_PARAMETER_VALUE_1…n | Value to be assigned to the parameter specified by its key |
| CUSTOM_PARAMETER_TS_1…n | A date and time will be saved in the register with the name of the specified parameter |
6. Real time Message Status Display
Once a broadcast has been configured and its been sent, the system will redirect you automatically to Broadcast Main Page, from where all the information related to any broadcast can be verified.
The main broadcast screen shows all the past blasts that have been delivered, including a few stats for each one such as Message Delivery Rate, Expected Messages, Sent Messages, Remaining Messages, % Sent and status. Using the Status link an active broadcast can be suspended temporarily or cancelled permanently (please note that some broadcasts may show a % Sent greater than 100% in cases where messages have been retried or a fallback method was used).
7. Scratch to Win (STW) - (only delivered to opt in users)
To start using the Scratch Card tools select the Campaign submenu and then open the Scratch Card option. You will enter the Scratch Card Main Screen. In the Main Screen you will see a list of all the cards that exist in the platform. To create a new Scratch Card click on the New Scratch Card button in the toolbar:
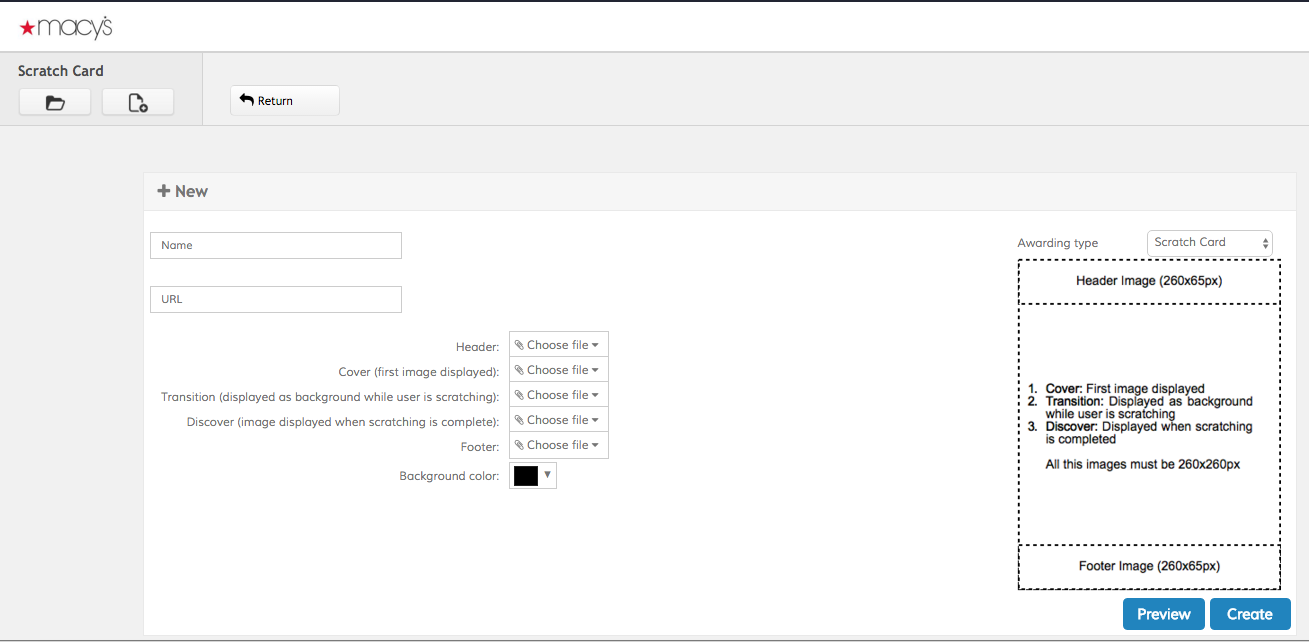
This will open the New Scratch Card screen:
Here's the breakdown of the required fields:
| Field | Description |
|---|---|
| Name | The name of the campaign. Please use a concise name and avoid special characters |
| URL | The URL to which the final Discover image points |
| Header | A 260×65 static header (will always be visible) |
| Cover | A 260×260 image that will be displayed in the center of the Scratch Card. This is the cover that the user must scratch in order to discover the hidden information |
| Transition | A 260×260 image that will be hidden when the Scratch Card is loaded. This image will be discovered as the user scratches the Cover. If you don't wish to use a transition image you can use the Discover image in this field |
| Discover | A 260×260 image that will be hidden when the Scratch Card is loaded and will be made visible after the user completely scratches the Cover image |
| Footer | A 260×65 static footer (will always be visible) |
| Background color | The background color to use for the responsive web page where the Scratch Card will be displayed |
Click preview to create a temporary Scratch Card and test the interaction. The preview Scratch Card is a fully functional card, so you are able to scratch the Cover image to test the Transition and Discover. Once you validate all the fields click on Create to store the card. After creating the card you will be taken to the Scratch Card Broadcast screen . Please note that at this point the Scratch Card has already been created, so if you don't want to send a broadcast (either you will be delivering the broadcast later, or you are going to use the Scratch Card in another interactive campaign) you can safely navigate away from this screen without losing your Scratch Card. You can also enter the Scratch Card Broadcast screen from the Scratch Card Main Screen by clicking on a Scratch Card name.
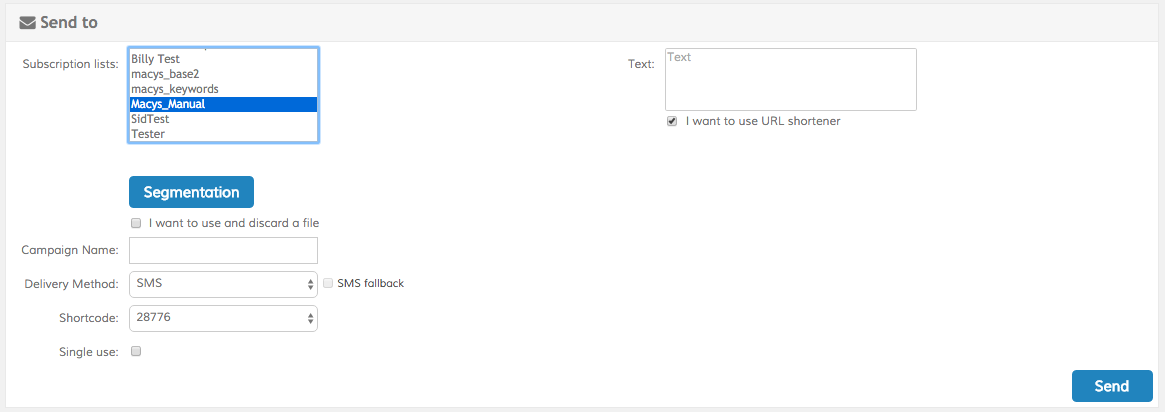
Once in the Scratch Card Broadcast screen you can click on Preview to test the Scratch Card, update any of the images (and click on Update to store your changes), or perform a broadcast. From the Send to box, select the Opt-in list this broadcast must be sent to: :
8. Reports
(a) Campaign Report: How to run campaign specific reports using different filters e.g. by Month, by Keyword
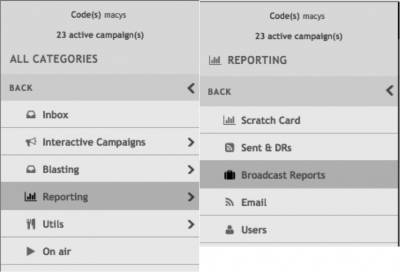
To get a report from campaigns you should access to Broadcast Reports from Menu in the tool bar and Reporting:
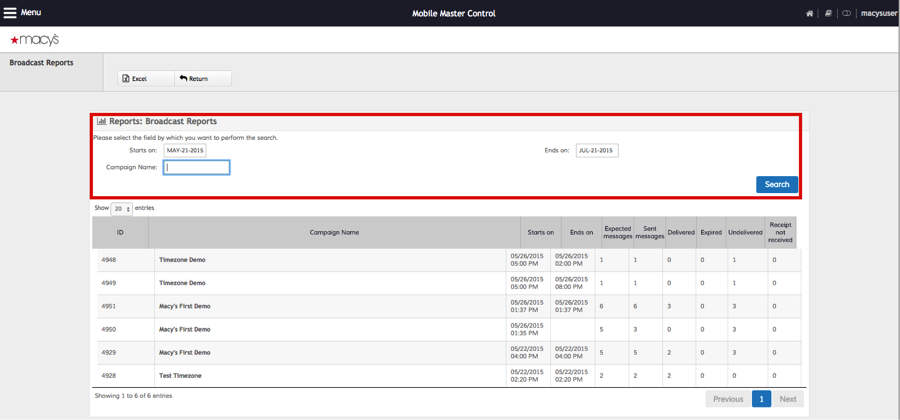
Now you can filter by month or search by name a specific campaign:
(b) Member profile Report: How to run Member profile report based on available criteria e.g., Opt-in status, deliverability, and Subscription status.
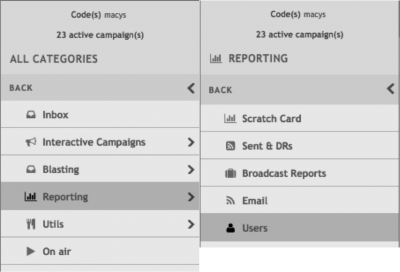
To get a report from user’s mobile number you should access to Users Report from Menu in the tool bar and Reporting:
Now you can perform a search by mobile number and see detailed information and interaction from that specific telephone number on each campaign:
9. How to set Default message
When a message is sent to the service and the keyword in it is not recognized the service will send an automatic default message. This can be configured following these steps:
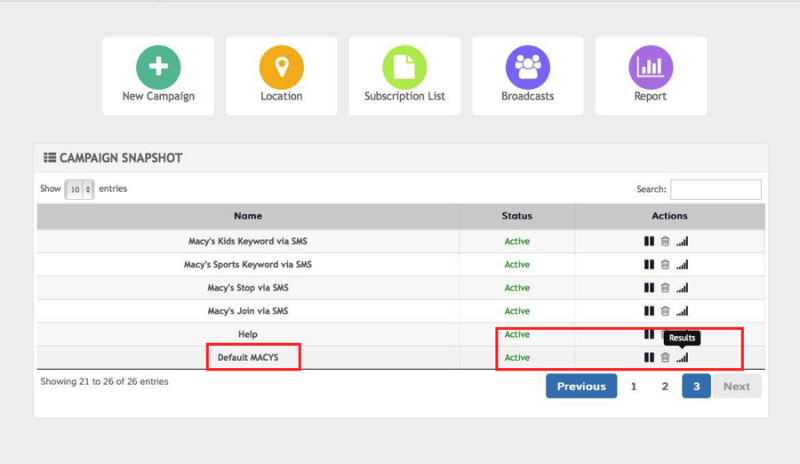
Go to home
From the Campaign Snapshot box select the Default one. It must be Active in order to edit. Click on Results
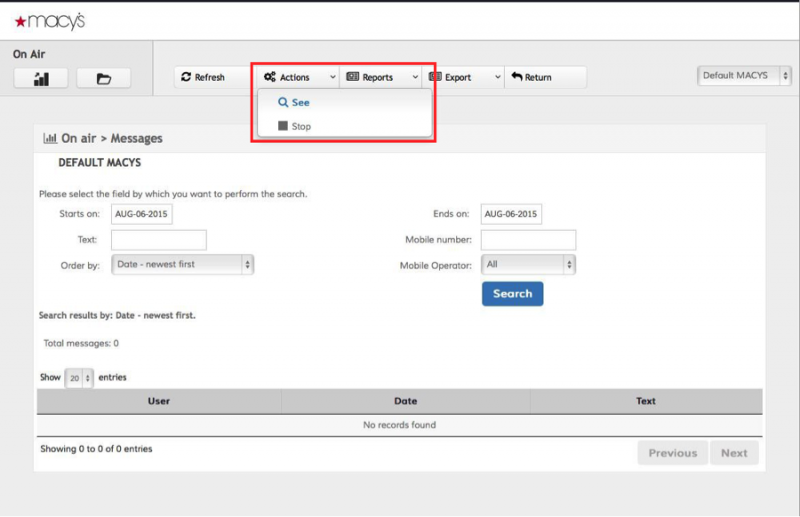
Now click on See:
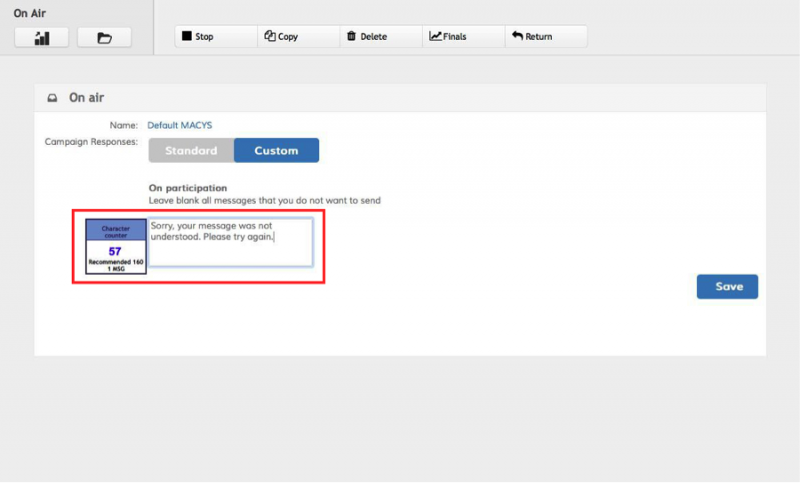
Now proceed to type in and save the message that must be sent as default when necessary
10. How to create Templates
The template will have the text of a message as a response to a REST API, that text may have parameters, which will help to personalize the message. In order to personalize the message we’ll use placeholders {x} that will have the field’s name with the information that must be placed in the message. Placeholder’s name must be written exactly as in the Json in the REST API petition e.g. {name}, {place}, {date}, {city}
To create a Template we need to click Menu then go to Utils and template:
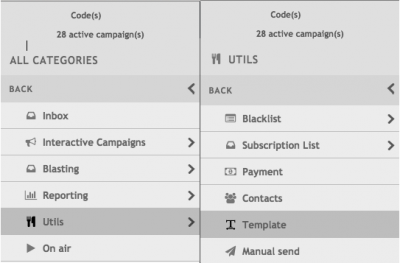
The main templates screen shows all the templates that are currently configured and active. Each ID is unique for each template. From here we can edit, delete or create a new Template
In order to create a new Template we have to click in New:
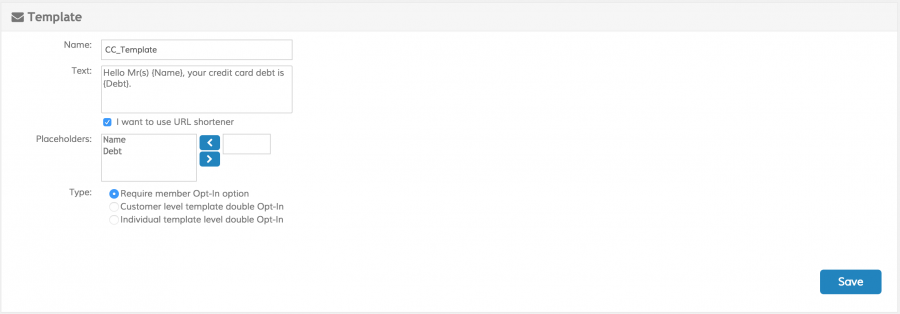
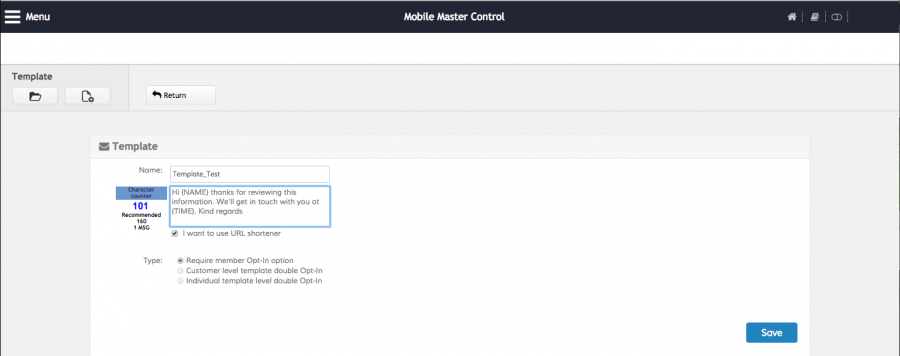
Fill in the name and the text that must be sent once the REST API is called and Save it:
We have our new Template active and ready to be used in the REST API call identified by ID or Name:

11. Segmentation file structure
In order to create and manage a campaign based on Segmentation service, the file with the information must comply with following guidelines:
1.- The mobile number must be the first field in the file
2.- The mobile number must only contain numbers
3.- The mobile number must be unique. If there are duplicates in the file, the registers will be overwritten.
4.- There are 3 ways for uploading a file into the platform: From a Dropbox account, from an URL or from your PC. However, it must be taken into account these following considerations:
a.- For files larger than 5 MB you must either provide an URL or upload them from Dropbox.
b.- For files size less than 5 MB, you must be able to use any mechanism including the direct upload from your pc.
c.- The upload time will depend on the file size. For example, a 160 MB file may take 15 minutes (more or less) to upload. We strongly recomend for Demo purposes the use of small files and to upload the data prior to the demo.
5.- The standard date format is YYYY/MM/dd
6.- General rules for the CSV file are the following: CSV is a delimited data format that has fields/columns separated by the comma character and records/rows terminated by newlines. All records should have the same number of fields, in the same order. Adjacent fields must be separated by a single comma. Any field may be quoted (that is, enclosed within double-quote characters). Some fields must be quoted, as fields with embedded commas, double-quote characters or each of the embedded double-quote characters Excel allows CSV export.
Please download from this link a sample Segmentation file

