Campaign Manager Customizations and New Features Manual
1. General Campaign Manager Overview
The Campaign Manager is a web based tool that's available via HTTPS. To log into the Campaign Manager please go to:
https://production.me.syniverse.com/starwoods
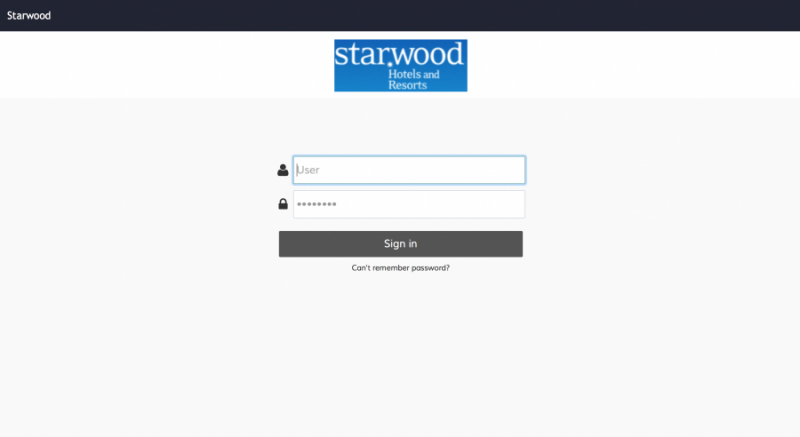
and enter your User/Password credentials:
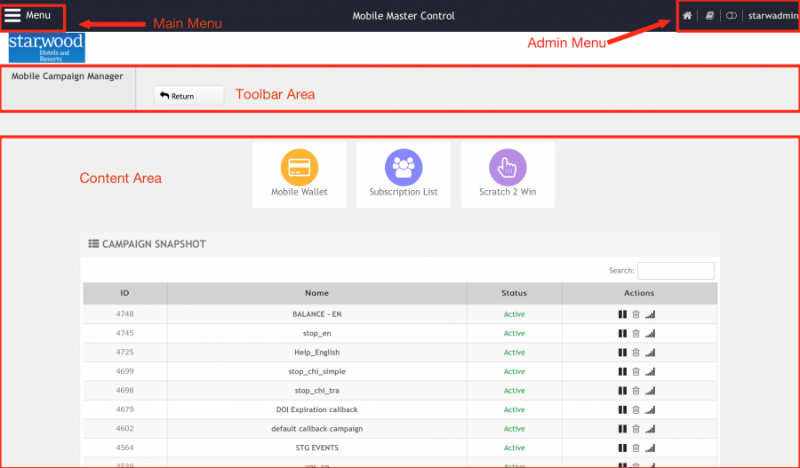
The Home Screen is the first page displayed after you log in to your account. The layout of the Home Screen varies depending on the role assigned to the account you are using. Every MMC screen is divided in 5 main elements:
Clicking on the Main Menu Button will slide the Main Menu Panel from the left of the screen. In the Main Menu Panel you will see a brief header with the available shortcodes and the Main Menu options. When navigating the Main Menu you will find options preceded by a < sign. Those options are sub menus that group additional options. So for example if you wish to set up an External Web Service campaign, you would click on Interactive Campaign and then External Web Service.
Return to the Home Screen by clicking on the Home Icon found in the Admin Menu on any screen.
2. Workspaces and Campaigns Setup
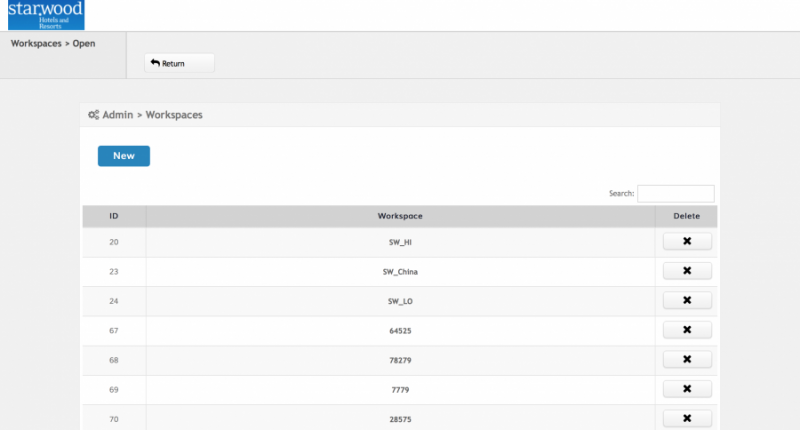
The Starwood instance contains several workspaces, with 3 workspaces serving as the main path for most of the MT traffic for different countries. SW_HI and SW_LO handle all MT/MO traffic for U.S. and Canada. For other countries, MT traffic is sent using Templates through REST API on the SW_China workspace, which in turn delegates the MT to the corresponding workspace using the country code according to the table below:
| Country Code | Workspace ID | Workspace Name |
|---|---|---|
| 44 | 80 | 447537415710 |
| 20 | 80 | 447537415710 |
| 234 | 80 | 447537415710 |
| 66 | 80 | 447537415710 |
| 679 | 80 | 447537415710 |
| 86 | 81 | 1069030020510 |
| 852 | 76 | 85296657324 |
| 61 | 75 | 61448831188 |
| 91 | 74 | 919663548377 |
| 62 | 73 | 628819903699 |
| 971 | 72 | 4625 |
| 27 | 71 | 35006 |
| 55 | 70 | 28575 |
| 56 | 69 | 7779 |
| 52 | 68 | 78279 |
| 54 | 67 | 64525 |
| 49 | 80 | 447537415710 |
| 33 | 80 | 447537415710 |
All MT Templates reside on the three main workspaces. MO traffic, registration API and subscription list information for members of countries other than US and Canada is handled by each country's workspace based on the mapping previously described. Main workspace IDs can be seen below:
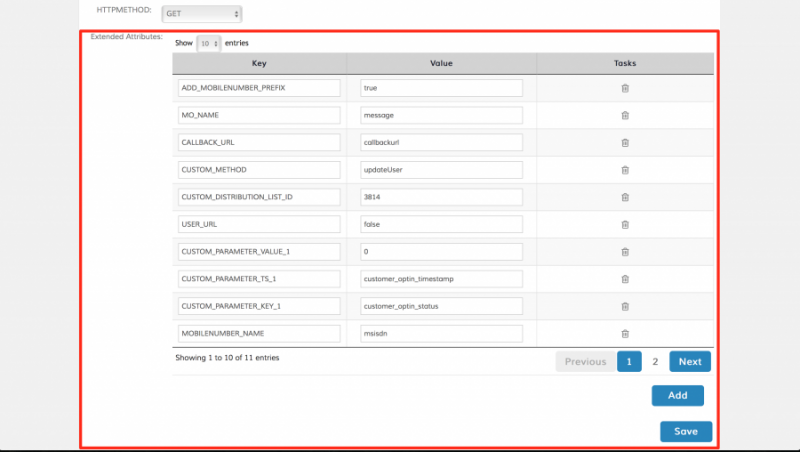
Starwood applications leverage External Web Service campaigns to process interactions from both employees and customers, handling registration confirmations, opt-outs and other events. This is achieved by adding Extended Attributes to these campaigns, in order to both customize parameter names added to the callback URL and to update certain user's information on its Subscription List. Extended Attributes are added on the bottom of the campaign creation page:
To add a new Attribute, add a new key value pair to the table by clicking the Add button. Remove Extended Attributes by clicking the Bin icon on the Tasks column. When finished, store the campaign settings bu clicking the Save button.
3. Optin / Optout Campaigns
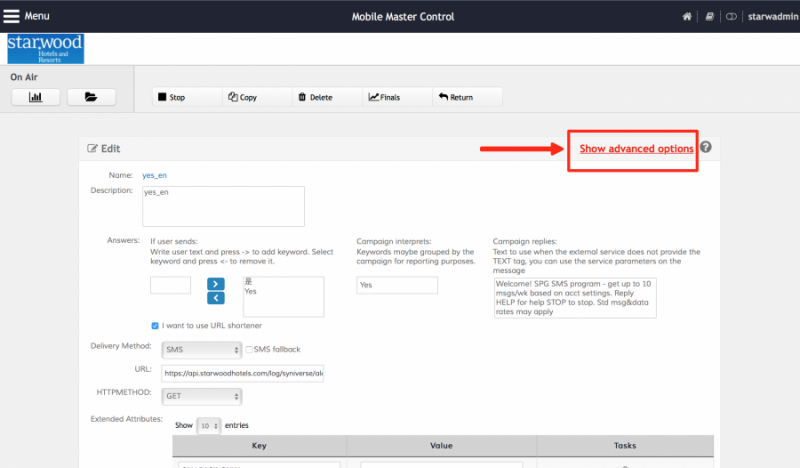
Optin campaigns take the yes keyword in each workspace (in the corresponding language), and update the user's customer_optin_status on its subscription list. These options are set on the advanced options tab of the creation page, displayed by clicking on the Show Advanced Options label:
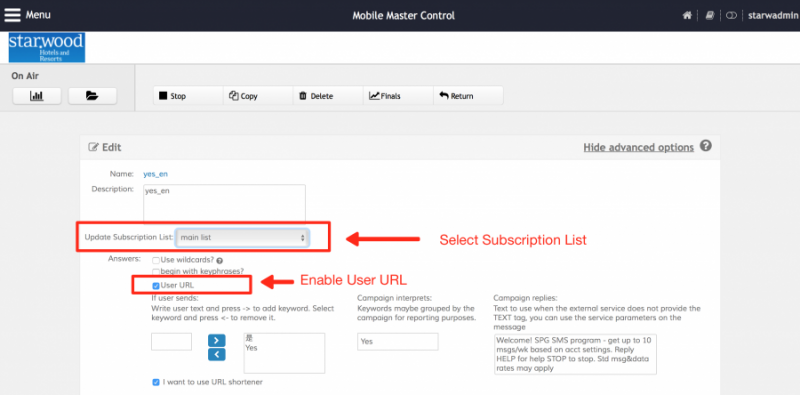
Select the list to be updated by the campaign in the Update Subscription List box. All members in each workspace are saved on its main list.
When the Starwood application registers users, it adds callbackurl parameter to them on the subscription list, when this parameter exists, and the registration is valid and unexpired (based on the user's timestamp parameter on the subscription list) the campaign will issue the callback to the URL stored on the callbackurl parameter. To enable this behavior check the User URL checkbox:
Here's the breakdown of the remaining Extended Attributes employed on these campaigns:
| Extended Attribute | Value |
|---|---|
| SERVICE_URL | The SERVICE_URL triggers the call from a campaign to a WebService that has been previously configured, every time it gets any of its keywords. |
| CUSTOM_METHOD (Mandatory) | This represents the method’s name that will be called internally by the campaign. In this case it shall be updateUser |
| CUSTOM_CALLBACK | This represents the action’s name to be reported in the callback action to the client |
| CUSTOM_PARAMETER_KEY_1…n | The name of a parameter to be modified in the subscription list |
| CUSTOM_PARAMETER_VALUE_1…n | Value to be assigned to the parameter specified by its key |
| CUSTOM_PARAMETER_TS_1…n | A date and time will be saved in the user's register with the name of the specified parameter |
| CALLBACK_URL | Sets the name of the list parameter that contains a registered user's own callback URL. |
| CALLBACK_ONLY | Do not try to parse the callback response when using the registered user's URL. |
| ADD_MOBILENUMBER_PREFIX | Add the + sign to the mobilenumber parameter value on callbacks. |
| MUTE_FAILURE | Supress the campaign's default MT response when the callback fails. |
| MOBILENUMBER_NAME | Sets a custom parameter name for the mobilenumber parameter sent in the callback. |
| MO_NAME | Sets a custom parameter name for the MO content sent in the callback. |
| OPERATOR_NAME | Sets a custom parameter name for the MO operator id parameter sent in the callback. |
To Optin a user, the campaign sets its customer_optin_status parameter to 1 on the subscription list, and updates the customer_optin_timestamp value with the date of the update.
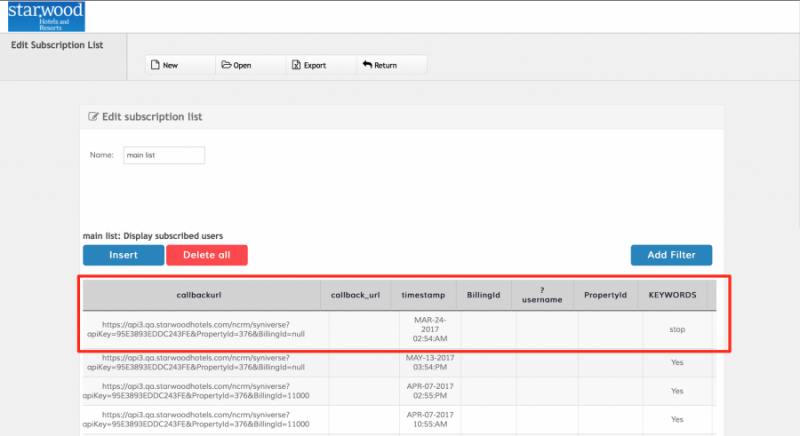
OptOut campaigns receive Stop keywords in each workspace, and only set the customer_optin_status to 0 and update the customer_optin_timestamp of users in the subscription list. OptOut campaigns issue callbacks only to the URL present in the campaign, they do not use the User URL option. You can check all relevant user parameters on the Subscription Lists interface:
4. Default Callback Campaigns
The Starwood application needs to receive events for every type of interaction users make through MOs. Each workspace has a Default Callback Campaign that will process any MOs containing invalid keywords, using the User URL behavior to trigger callbacks from registered users, and sending an MT response otherwise. These campaigns will always be active in each workspace.
5. Keyword Campaigns
Keyword campaigns are the most common SMS marketing campaign type. A keyword campaign is designed to reply to an end user when the end user texts in a specific keyword or phrase to a shortcode or longcode.
In the case of Starwood keyword campaigns are configured to reply Help messages.
Example Use Case
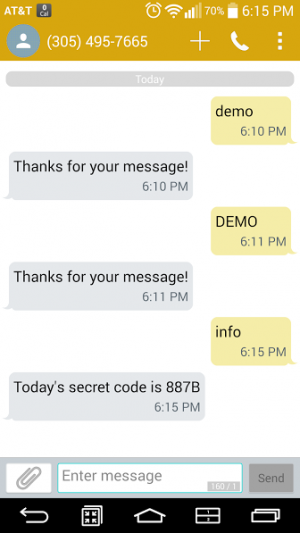
We want to set up a keyword campaign in the 13054957665 longcode that will receive the word demo or DEMO and will respond with the message Thanks for your message!. To do this we click on the Main Menu Button, click on Campaign and select the Keywords option. We will see the following screen:
Click on Create New and fill in the required information. Here's the breakdown of the required fields:
| Field | Description |
|---|---|
| Name | The name of the campaign. Please use a concise name and avoid special characters |
| Description | A short description of the campaign |
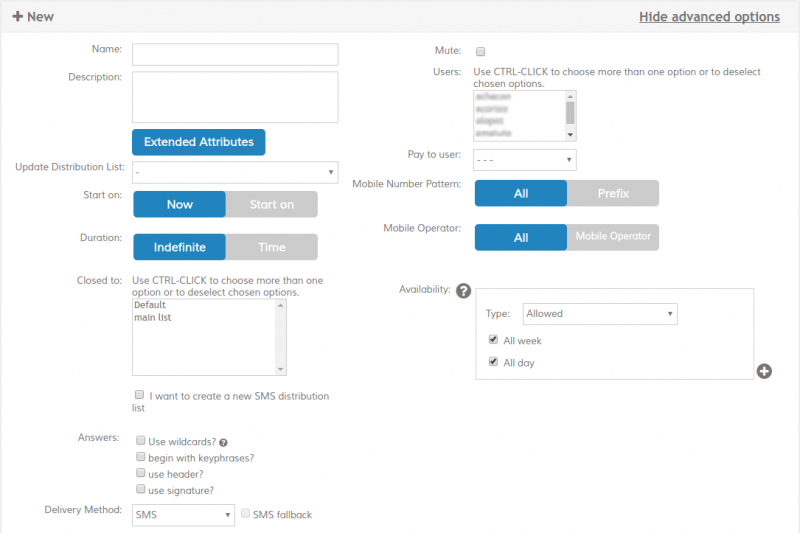
The following options can be modified if you click the Show advanced options link
| Field | Description |
|---|---|
| Start on | Select Now if you will activate the campaign inmediatly once it has configured. If you wish the campaign to be activated automatically at a given date and time change the selector to Start On, click on the box below and choose the desired date and time |
| Duration | Select Indefinite if you will deactivate the campaign manually once it has finished. If you wish the campaign to be deactivated automatically at a given date and time change the selector to Time, click on the box below and choose the desired date and time |
| Closed to | Use this field to select a closed Distribution List to limit the people who can interact with the campaign. If you don't select a distribution list the campaign will be open and anybody will be able to participate (this is the desired option most of the time). If you select at least one distribution list only users that exist in the list will receive the answers configured in the campaign, and only those users will show up in the reports (any text by a user not present on the distribution list will be responded by the default message). If you wish to create a closed distribution list on the fly (i.e. not use a preexisting one) select I want to create a new SMS distribution list and upload a CSV or Excel file containing the list of mobile numbers |
| Answers | Select Use wildcards? if you wish to use advanced regular expressions |
| Mobile Number Pattern | The user can filter the prefix that can interact in this campaign, using a simple string or a regex. This attribute is only available to root users |
| Mobile Operator | The user can filter the mobile operator that can interact in this campaign, choosing these from the list |
| Availability | Build the shipment planning rules. By default shipment is allowed every day of the week at any time. For more details see Availability Schedule. |
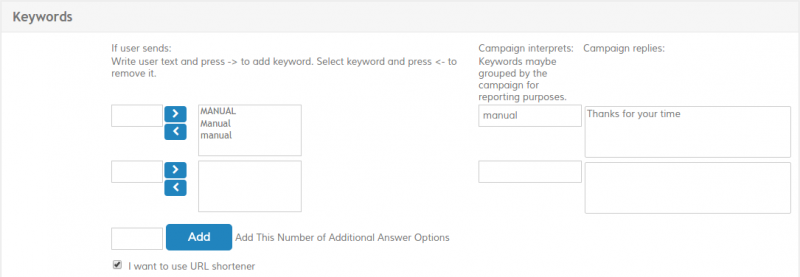
Use the Keywords section to map the expected input from the user with the appropriate response. Grouping several terms in the same keyword lets you answer several inputs with the same response text, but also simplifies reporting. When reports are generated all the inputs that match a certain keyword are grouped using the Campaign interprets field. So in this example:
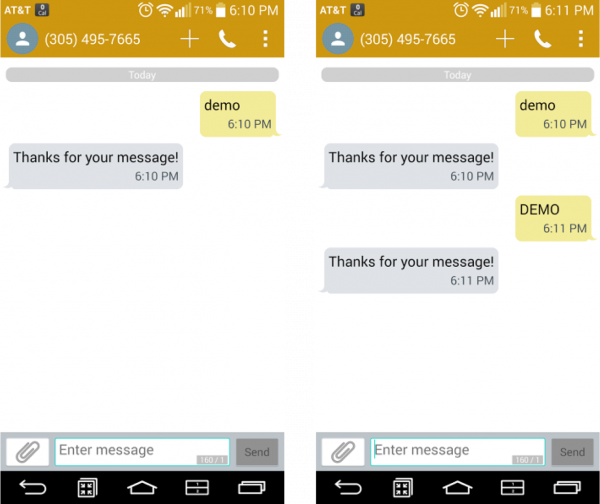
users that send demo or DEMO will receive the same message (Thanks for your message! in this example), but they also will be grouped as demo in the reports. Now, click on Save if you wish to save but not activate the campaign (if you wish to activate it later) or click Activate to save it and make it available to your users. Let's try sending a message to the longcode and see the system's response:
If we want to add a new term to our Keywords campaign we would select the View All Existing Keywords button in the toolbar:
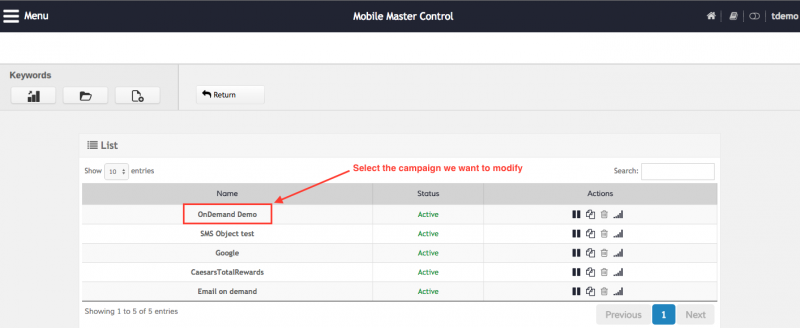
Then select the campaign you wish to modify:
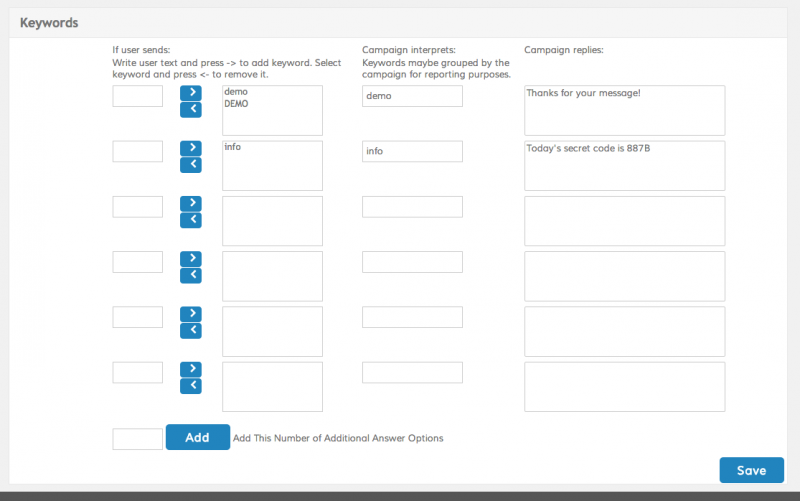
And add a new keyword to the campaign. In this case we are going to create an info keyword that responds Today's secret code is 887B:
Click on Save and let's test it from the handset:
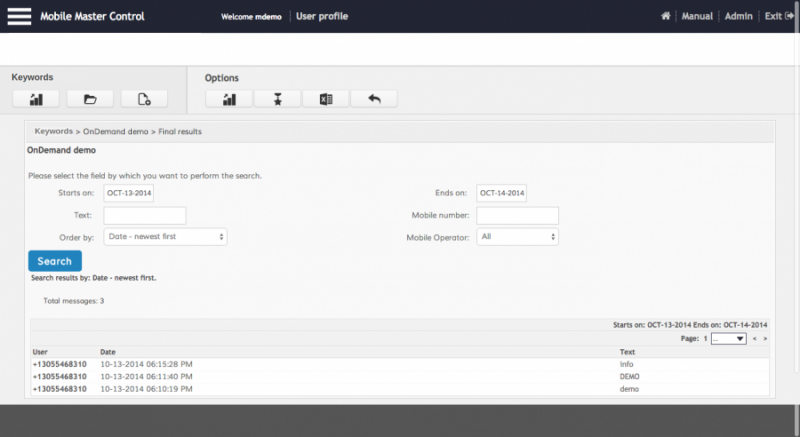
To view the live results of your campaign select the campaign from the Keywords main screen and click on the View Campaign Results button on the toolbar:
You will be presented with today's traffic for the campaign. If you wish to see the traffic for any other period of time use the Starts on and Ends on controls and click Search.
6. How to create Templates
The template will have the text of a message as a response to a REST API, that text may have parameters, which will help to personalize the message. In order to personalize the message we’ll use placeholders {x} that will have the field’s name with the information that must be placed in the message. Placeholder names must be written exactly as they will appear on the jSON body of the REST API request e.g. {name}, {place}, {date}, {city}
To create a Template we need to click Menu then go to Utils and template:
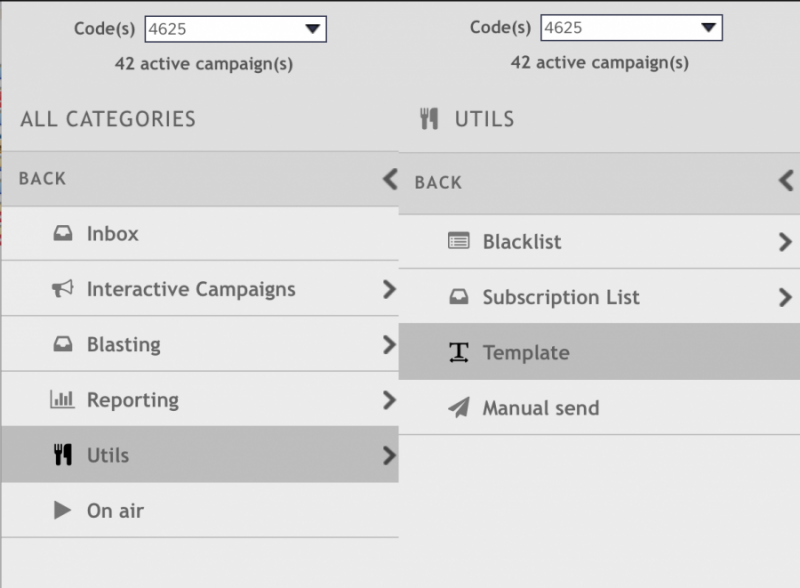
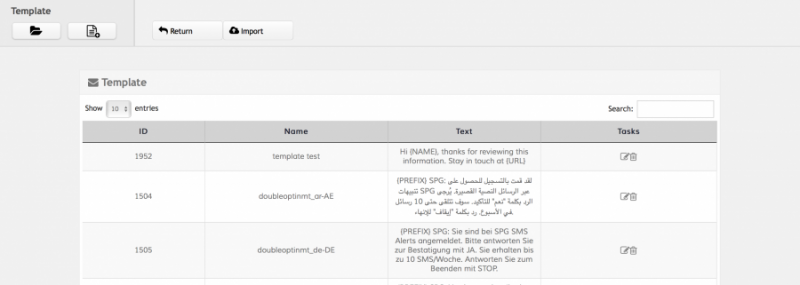
The main Templates screen shows all the templates that are currently configured and active. Each ID is unique for each template. From here we can edit, delete or create a new Template
In order to create a new Template we have to click in New:
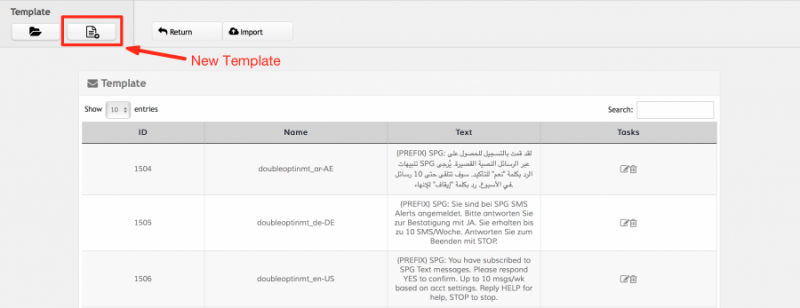
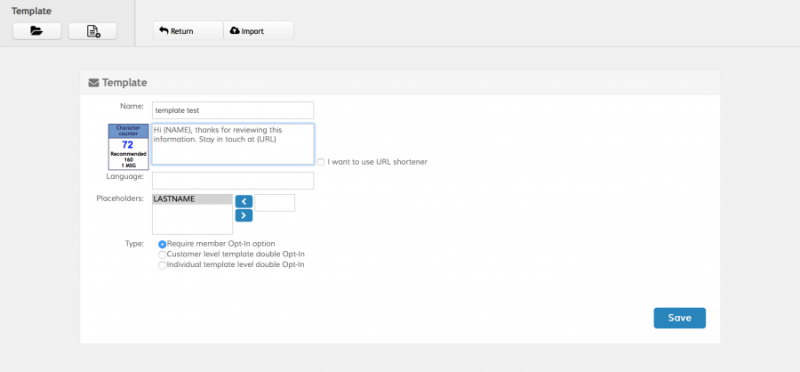
Fill in the name and the text that you want sent through the REST API. You may also store placeholders for future use apart from text by typing them on the placeholders input section and adding them to the list by clicking the left arrow. The Language field is optional and allows you to assign a language to your template to improve reporting. The I want to use URL Shortener option allows automatic shortening of all URLs contained in the template text. You may now Save your template:
We have our new Template active and ready to be used in the REST API call identified by ID or Name:
