Android Studio Integration Manual
Notes
Please review the SDK Overview for information on how the SDK connects the mobile app with the Campaign Manager.
Downloads
Configuration
Create or Open the Project in Android Studio
Add the Messangi Library
- Download the Messangi Library
- Go to File > New > New Module
- Select “Import JAR/AAR Package” then “next”
- Click the “…” button next to the “file name” field. Select the file messangiSDK.aar from the directory where you downloaded it and click “Finish”
- Wait for the Gradle synchronization job to finish.
Add Dependencies
- Go to “Open Module Settings”
- Select the project and go to the “Dependencies” tab
- If MessangiSDK is not a dependency, add it by clicking on “+”, select “module” and “MessangiSDK”.
- Currently you have to manually add the dependencies for the Messangi SDK, Gradle will not add them automatically. Go to “Gradle Scripts” > “build.gradle(Module:—projectName—)”
- Add the below lines in the dependencies section before the “compile project(‘:messangisdk’)” line:
        compile 'com.google.android.gms:play-services-base:9.4.0'
        compile 'com.google.android.gms:play-services-location:9.4.0'
        compile 'com.google.android.gms:play-services-gcm:9.4.0'
        compile 'org.altbeacon:android-beacon-library:2.9.1'
Manifest
1. Open AndroidManifest.xml and add the following code:
  <permission
      android:name="${applicationId}.permission.C2D_MESSAGE"
      android:protectionLevel="signature" />
  <uses-permission
      android:name="${applicationId}.permission.C2D_MESSAGE" />
Please note that you should have an applicationId in the Gradle defaultConfig (this is added automatically in Android Studio).
2. If you are using a broadcast receiver to receive push notifications while your application is not running, you must register to receive the com.ogangi.messangi.android.sdk.PUSH_NOTIFICATION action (Optional):
  <receiver
    android:name="com.ogangi.messangi.android.demo.SimpleNotificationReceiver"
    android:enabled="true">
    <intent-filter>
      <action android:name="com.ogangi.messangi.android.sdk.PUSH_NOTIFICATION" />
    </intent-filter>
  </receiver>
Integrate the SDK with your MainActivity
1. Open MainActivity.java and add the following import:
import com.ogangi.messangi.android.sdk.*;
2. Implement MessangiListener in MainActivity:
      public class MainActivity extends Activity implements MessangiListener {
        ...
      }
3. Once the initialization process has been completed the SDK will call the postInit() method of all the MessangiListeners that were registered. Use that method to complete your application’s launch process (it is recommended to run the synchronize() method in a separate thread to prevent any blocking):
    @Override
    public void postInit() {
        new Thread(new Runnable() {
           @Override
           public void run() {
              Messangi.getInstance().synchronize();
              // Initialize your application
           }
         }).start();
    }
4. Add the onGeofenceUpdate, onBeaconUpdate ,updateFencesStatus, onLocationChange and pushReceived methods to your Activity class. These methods are the callbacks that will be called by Messangi when information for your app is available.
    @Override
    public void onLocationChange(Location location) {
        // Use this method to handle any location change.
    }
    @Override
    public void updateFencesStatus(List<Geofence> geofences, int geofenceEvent, Location location, Workspace workspace) {
        // Use this method to handle any changes in the Geofences status. This is an
        // informational method that can be used to update any maps or other views
        // showing the geofences. The location parameter contains the location trigger
    }
    @Override
    public void pushReceived(MessageVO messageVO, Workspace workspace) {
        // This method will be called every time the user receives a push notification
        // via Messangi.
        // Use this method to display the content of the notification, add it to your app
        // or handle the in-app notification.
    }
    @Override
    public void onGeofenceUpdate(String type, String geoFenceID, Workspace workspace) {
        // This method will be called every time the user receives a Geofence
        // create, update or delete event (ie, a Geofence is updated using the API).
    }
    @Override
    public void onBeaconUpdate(String type, String beaconID, Workspace workspace) {
        // This method will be called every time the user receives a Beacon
        // create, update or delete event (ie, a Beacon is created using the API).
    }
5. If you are targeting Android 6 support you need to add the onRequestPermissionsResult callback in your MainActivity, and delegate the call to the Messangi.onRequestPermissionsResult() method.
@Override
public void onRequestPermissionsResult(int requestCode, String permissions[], int[] grantResults) {
    try {
        Messangi.getInstance()
            .onRequestPermissionsResult(requestCode,
                    permissions,grantResults);
    } catch (Exception e) {
        e.printStackTrace();
    }
}
Configure the Messangi SDK
1. Modify the onCreate method and add the Messangi credentials:
    @Override
    protected void onCreate(Bundle savedInstanceState) {
        super.onCreate(savedInstanceState);
        // Messangi Credentials
        Messangi.getInstance().setAppName(**App Name**);
        Messangi.getInstance().setClientId(**Client ID**);
        Messangi.getInstance().setApiClientPrivateKey(**Private Key**);
        // GCM Credentials
        Messangi.getInstance().setGcmApiKey(**Google Cloud Messaging API Key**);
        Messangi.getInstance().setGcmProjectId(**Project Number**);
        // Subscription manager
        Messangi.getInstance().setSubscriptionURL(**SubscriptionURL**);
        Messangi.getInstance().setSubscriptionInstanceId(**SubscriptionInstanceId**);
        Messangi.getInstance().init(this);
        Messangi.getInstance().addMessangiListener(this);
        Messangi.getInstance().registerDialog(this, this);
        //Rest of your code
        //..
    }
Add the parameters provided to you: App Name, Client ID and Private Key. In order to receive push notifications you must also add the Google Cloud Messaging API Key and Project Number found in your Android Developer Console. If you use Subscription List then you should also add SubscriptionURL and SubscriptionInstanceId. The subscription attributes reference back to the Campaign Manager instance (the REST API URL, and the Workspace ID) and allow the SDK to make subscription based callbacks.
Please note that you must use your Project Number instead of your Project ID. This method will be renamed in a future release.
Messangi can take care of the entire registration process by calling Messangi.getInstance().registerDialog(this, this). This will display a prompt that will let the user enter his mobile number and validation code once the validation SMS has been delivered.
Alternatively you can use the register instead of registerDialog method to skip the validation process if you have your own login, authentication or user mapping process:
        //..
        Messangi.getInstance().register(this, this, "TOKEN");
        //..
Credentials can be loaded from a XML resource file with the format:
<resources>
  <string name="messangi_app_name" translatable="false" templateMergeStrategy="preserve">...</string>
  <string name="api_client_private_key" translatable="false" templateMergeStrategy="preserve">...</string>
  <string name="client_id" translatable="false" templateMergeStrategy="preserve">...</string>
  <string name="gcm_api_key" translatable="false" templateMergeStrategy="preserve">...</string>
  <string name="gcm_project_id" translatable="false" templateMergeStrategy="preserve">...</string>
  <string name="subscription_url" translatable="false" templateMergeStrategy="preserve">...</string>
  <string name="subscription_id" translatable="false" templateMergeStrategy="preserve">...</string>
  <bool name="analytics_allowed">true</bool>
  <bool name="location_allowed">true</bool>
  <bool name="logging_allowed">true</bool>
  <integer name="max_stored_messages">15</integer>
</resources>
In this case create the xml file in te res folder of your project, and load it using:
Messangi.getInstance().loadCredentials(this);
Messangi.getInstance().loadSubscriptionCredentials(this);
Messangi.getInstance().loadEnvironment(this);
2. (Optional) Use the Android Lifecycle onStart, onResume and onPause to handle MessangiService
    @Override
        protected void onPause() {
        Messangi.getInstance().unBindService();
        super.onPause();
    }
    @Override
    protected void onResume() {
        super.onResume();
        Messangi.getInstance().bindService();
    }
You could invoke the unbindService and bindService methods elsewhere, but we recommend these.
logEvent Facility
Events can be generated in the Analytics platform via the logEvent facility. You only need to provide the EVENT_TYPE and EXTRA_INFO. Each event registered in the platform will contain all the fields documented in the Events section of the Data Structure page if the relevant permissions were granted. Please note that you do not need to provide any of those values, as those are captured automatically by the SDK.
You can access the logEvent facility from any section of your app by using:
Messangi.getInstance().logEvent(this, "EVENT_TYPE", "EXTRA_INFO");
For example, our Android SDK makes the following call every time the SDK is initialized (i.e. the user starts the application):
Messangi.getInstance().logEvent(this, "INIT", "");
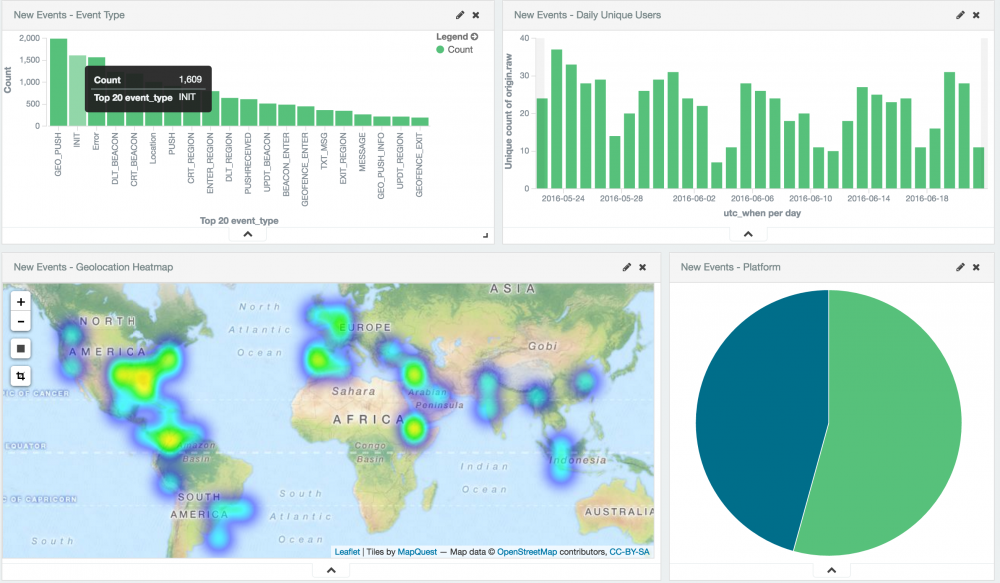
Which will generate the corresponding events every time the specific action occurs (in this case, the app is opened) and will populate the Analytics platform with all the event information (location, platform, event type, etc. More info on these fields is available in the Data Structure section). These events will be shown along all the events being generated by the SDK or the application itself in the corresponding dashboard:
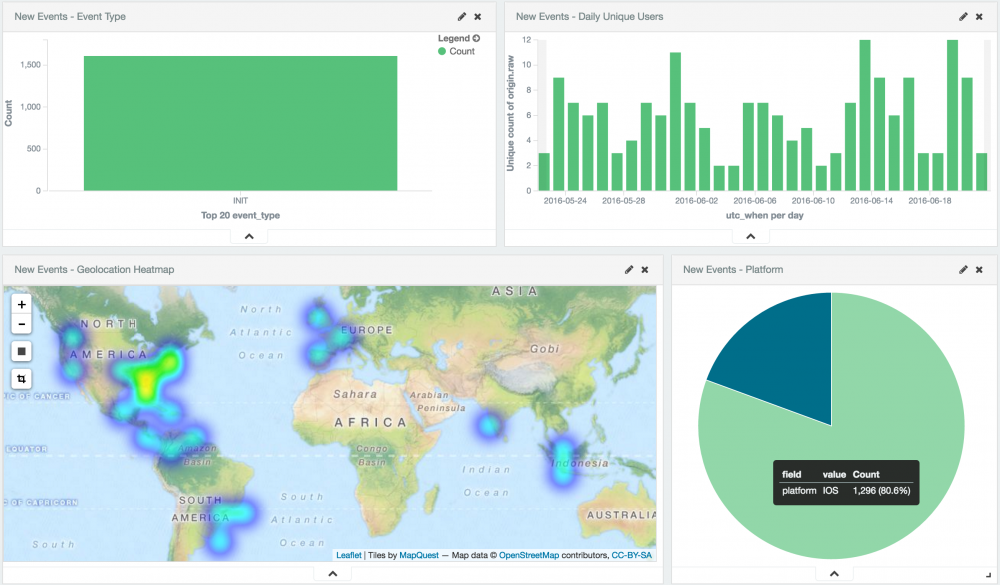
Since the INIT event is an independent event type you can use the dashboard to filter only those events, and perform analytics and BI tasks on the data. In this example, location, platform and daily unique users that open the application:
Please refer to Data Structure, Events, Location, Aggregation and Dashboard for more information.
Metadata and InApp Messages
InApp Messages are always delivered as silent push notifications. These notifications have an expiration time and at least two other properties in the Metadata field of the incoming Message object. The Metadata field is encoded as Base64 and uses JSON as default formatting, however any format can be used when sending Notifications via the REST API. InApp messages are handled silently to the Application, and it is the Application responsibility to use the Message content and Metadata to decide how to process it. Please refer to the InApp Messages documentation to se how to include the Metadata values.
Application developers use the MessageVO.getMetaData() method to obtain the raw Metadata sent from the Web Interface or REST API. The Metadata is returned as a Base64 encoded String and can be decoded by Android's internal Base64 decoder. Once decoded the content can be parsed and all relevant fields extracted:
String encodedData = message.getMetadata();
if (encodedData != null) {
    // The metadata is received Base64 encoded
    String decodedData = Base64.decode(metadata, Base64.DEFAULT);

    // Parse the JSON and handle any errors
    try {
        JSONObject metadata = new JSONObject(decodedData);
        String deepLink = metadata.getString("deep-link");

        // Handle the deep link
    } catch (JSONException _e) {
        // Handle any errors caused by badly formed JSON data
    }
}
The InApp Metadata content can be used to modify the app's behavior based on information entered in the Campaign Manager UI or REST API.

